
Around the interwebs, you will find much advice on how to achieve that glorious explosive oven spring we all crave. One thing they all have in common is very simple advice.
Use steam!
Yup, steam is the magic ingredient mentioned in every recipe. The ways to add steam to you oven include:
- Bake inside a Dutch Oven/Cloche
- Put baking sheet on floor of oven, add boiling water before you close the door
- Put baking sheet on floor of oven, add ice cubes before you close the door
- Put tray of boiling water on floor of oven, place bread on baking stone with upturned pan covering it, leaving a gap between the pot and stone to allow steam to rise up into the chamber
- Put lava stones on a tray on the oven floor and add boiling water before you close the door
- Spritz the loaf and/or sides of the oven before you bake
By far the most recommended is to use a Dutch Oven. That means cast iron, enamelled or not. Some Dutch Ovens (like mine) have a flat lid that can be used as a skillet – this is great because you can invert the whole thing, and bake in the shallow section. Now you can avoid dropping dough in to a high-sided pot at 250°C. I can show you the scars to demonstrate why that is a good idea.
You can spend $250 of dollars on a Le Crueset, or $40 off Amazon. As long as the lid fits to trap steam and it’s sized for your loaves, then you’re good to go. Mine is 5.7 litres. It’s around 22cm at the narrowest part of the lid and has about 17cm of vertical rise height inside. Which is HUGE for a single 1kg loaf. The “combo” ovens you see in a lot of videos won’t fit my oven due to the long handle. So mine only has little handles on either side – I think it’s geared towards camping.
On the other hand, before I acquired my cast iron Dutch Oven, I used a circular Pyrex casserole dish. Again I cook inverted so my bread goes in the lid which is 17cm at the narrowest part. Total vertical rise height is about 13cm. This is also big enough for a 1kg loaf, but I have occasionally had the loaf touching the roof. Maybe if my oven spring was any good I would find the casserole too small, but meh. I guess it’s around 3.5 litres in volume.
I’ve experimented a couple of times with batards that won’t fit in a pot, and used trays of boiling water at the bottom of the oven. Results were mixed, but I was a fresh novice, so maybe there was some other technique malfunction that contributed to the failures.
The Test Criteria
So I got to wondering, is this all good advice? Should there be more passionate advocating of one method over another? The only way to know would be to fiddle in Twisty’s Test Kitchen. Which is my only kitchen.
Bake four identical loaves, using four different techniques for adding steam.
The four different methods:
- Bake in a Dutch Oven
- Bake in a glass casserole dish
- Bake with a tray of steam
- Bake with my oven’s superheated steam function + convection
The Test Recipe
| Strong White Bread Flour | 600 |
| All Purpose Flour | 200 |
| Whole Wheat Flour | 200 |
| Starter Flour | 100 |
| Starter Water | 100 |
| Total Starter | 200 |
| Water | 750 |
| Total Flour | 1100 |
| Total Water | 850 |
| Hydration % | 77 |
So this is basically Twisty’s Country Sourdough recipe. Which in itself is Twisty’s Sourdough recipe, but with a bit more water due to the heavier wholemeal flour added. 77% for the country version Vs 72% for the basic white. And this is double-duty size as I want to make multiple loaves.
As it happens I have four 15cm/6″ bannetons, so I will make four 250g loaves and a fifth 950g loaf for someone else in a 9″ banneton.
The method I used was slightly different due to the higher hydration. Believe me, this is not an 85%+ hydration nightmare, but it’s quite a jump from 72% to 77%.
The Test Method
10am; Use scrapings to make starter (levain/leven/biga/poolish). Approx 50g of scrapings with 100g rye flour and 100g water at 32°C. This is known as a 1:2:2 ratio of one part starter to 2 parts each of flour and water.
3pm; Hand mix 700g of the water with the flours in a bowl until a shaggy ball. Cover and autolyse for an hour. 30 mins to four hours is fine.
4pm; Mix remaining 50g of water with salt, sprinkle over dough. Slosh starter over dough. Hand mix until fully incorporated. Cover and bench rest for 30 mins.
4.30pm; with a wet hand, pinch the dough at the side and bring it up, over and in to the centre. Be careful not to tear it, but you should get a good stretch. Do this to the north, west, south and east of your dough – these four folds is one “turn”. Cover and rest 30 mins.
5pm; Same as before. Perform four folds/one turn of your dough.
5.30pm; And again. Third set of folds.
6pm; And your fourth turn. After this you’re going to leave the dough to do it’s first rise (or bulk ferment if you’re the kind of person who eats Gooseberry and Acacia Yo-gurt). Only you can tell how long that is, as kitchen conditions vary. Approx 1-4 hours, where 1hr is a very warm tropical kitchen and 4hrs is in the kitchen of hell once it’s frozen over.
But slow is good, as that is when flavour develops. Between around 21°C and 25°C is nice, as the bacteria and yeast share a common profile. Above 25°C the bacteria will grow faster than the yeast until the yeast eventually dies off.
I figured mine was looking good around three hours later, in my Hong-Kong winter kitchen.
9pm; pour dough on to only slightly dusted surface. Use bench scraper to separate out four pieces of dough at 250g and one at 950g. Pre-shape all five pieces into balls. I tend to gently flatten out, then pull the edges in to the centre to create a ball, then either do pulls with the bench scraper, or use my hands to pull the ball towards me, tightening the skin. Turn through 90° and repeat until you have a nice tight ball. Cover and bench rest for 30mins.
9.30pm; After 30mins, the balls will have sagged/spread a little, so now it’s time to shape them into tighter balls. I take a pre-shaped ball, and dust the top very lightly and invert it. Again, I pull all the edges in to the centre, probably around 4-8 times around the clock. Then turn the seam to the bottom and do bench pulls with scraper or hands until the surface tension is built and it’s like poking a jelly. Careful not to break the skin here.
Place your shaped ball in to a well-floured banneton (or colander with a clean, floured tea-towel). If you use regular flour, it will absorb moisture from the loaf as it proves and get sticky. So most people will use rice flour, which is vibrant white. I sometimes like cornmeal flour which is yellower, or even cornmeal for that gritty texture.
10pm all bannetons are covered in shower caps (or put in plastic bags) and placed in fridge. This is a departure for me as I usually do the second prove uncovered, to develop a bit of a “skin” to the dough that helps with shape. But now I want to preserve moisture.
So far, so good. Everything is identical for each loaf – well, as identical I can hand-make things. Which is not very. After 12-15 hours, we’re going to bake them all differently.
The Test Bake
I left all the bannetons in the fridge until the oven was preheated for each bake. So the later bakes got a little more fridge time but without four ovens it was the only way to get as much consistency as possible. There wasn’t any visible difference in size.
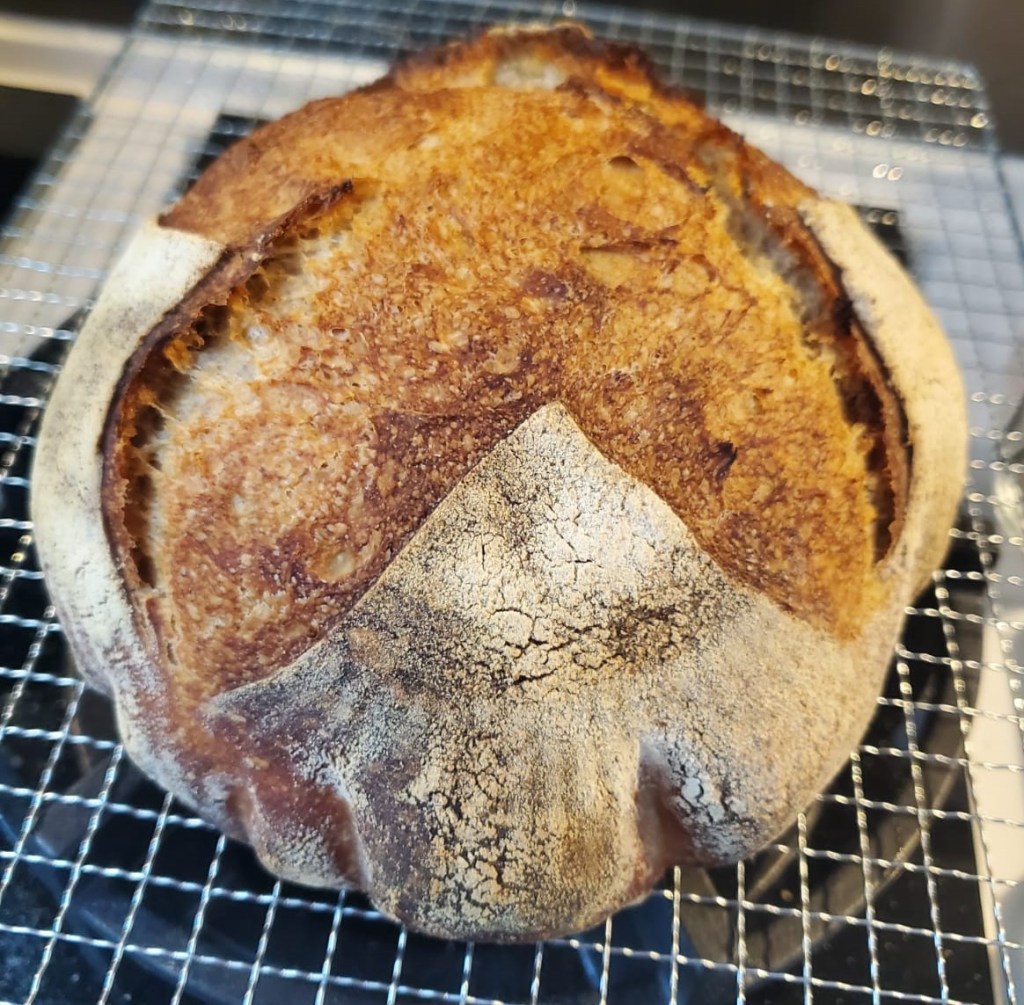
Once preheat was complete, I took the dough from the fridge and scored before putting in the oven.
All loaves were baked at 250°C for 15 mins covered (except the tray of steam method which was uncovered throughout.), then at 220°C uncovered for 20 mins. Being small, they didn’t need any more time. All loaves were verified to have reached 95°C with a probe thermometer.
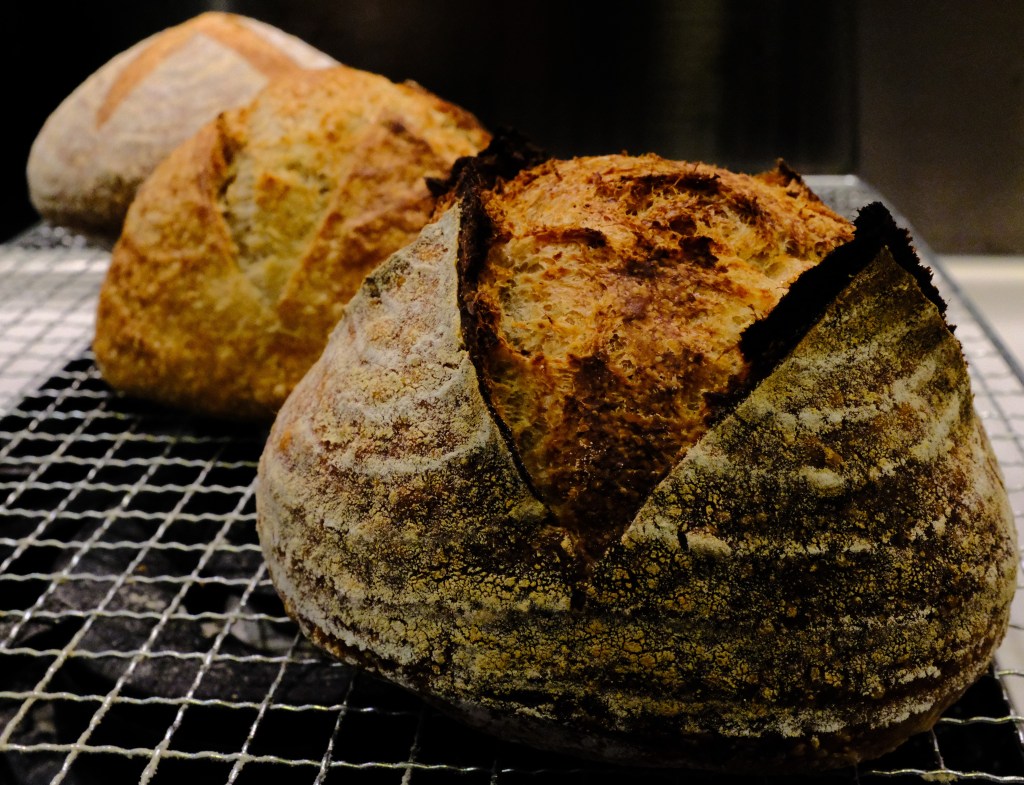
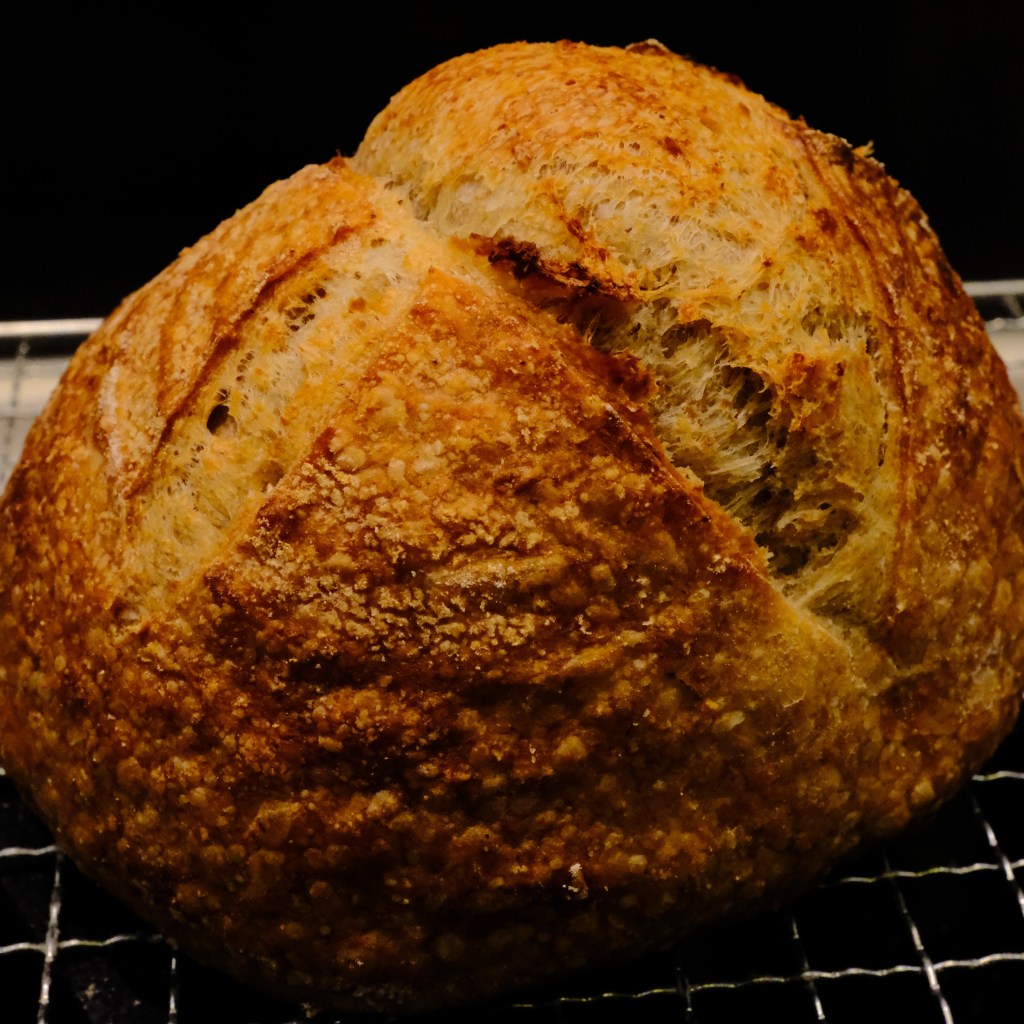
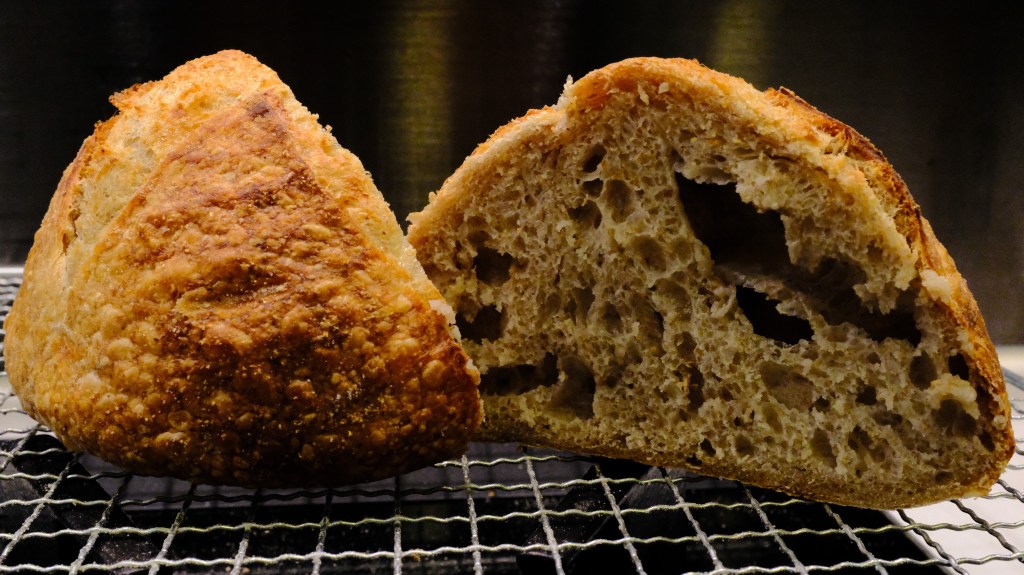
Bake in a Dutch Oven
The Dutch Oven produced a classic Sourdough look. Lovely flour stripes on the dough, interspersed with blistering of skin as the bubbles hardened. Nice, deep colour, good ears developed. Excellent oven spring and you can see the bread bursting through the simple X shape scoring.
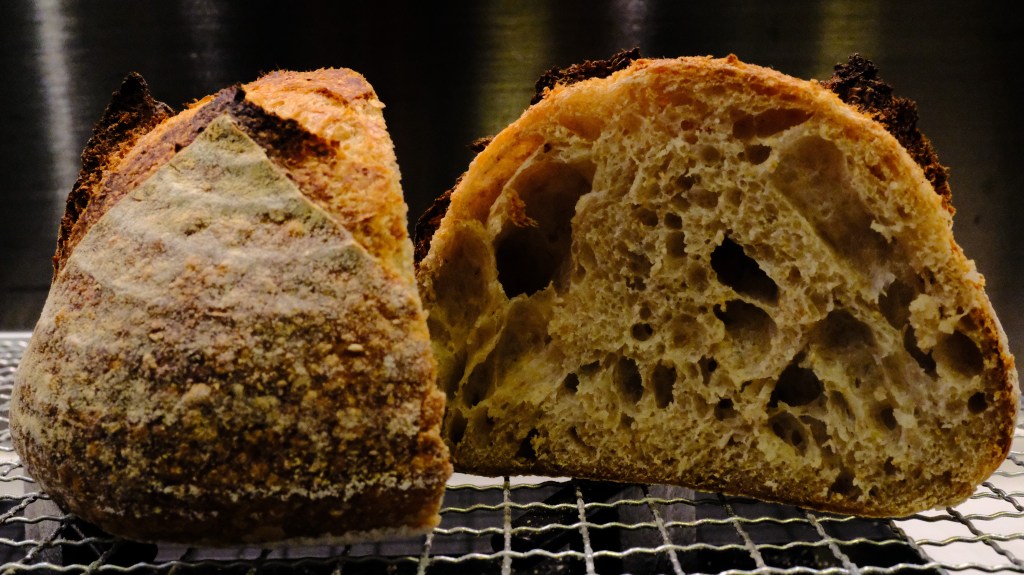
The crumb was excellent too – I feel like I really for the recipe and shaping right in this process. Some excellent big bubbles and the classic sourdough look. A slight glossiness to the crumb, that lovely chewy texture we’d expect. On a small loaf the holes look ridiculously large but this would make sense if the loaf was larger.
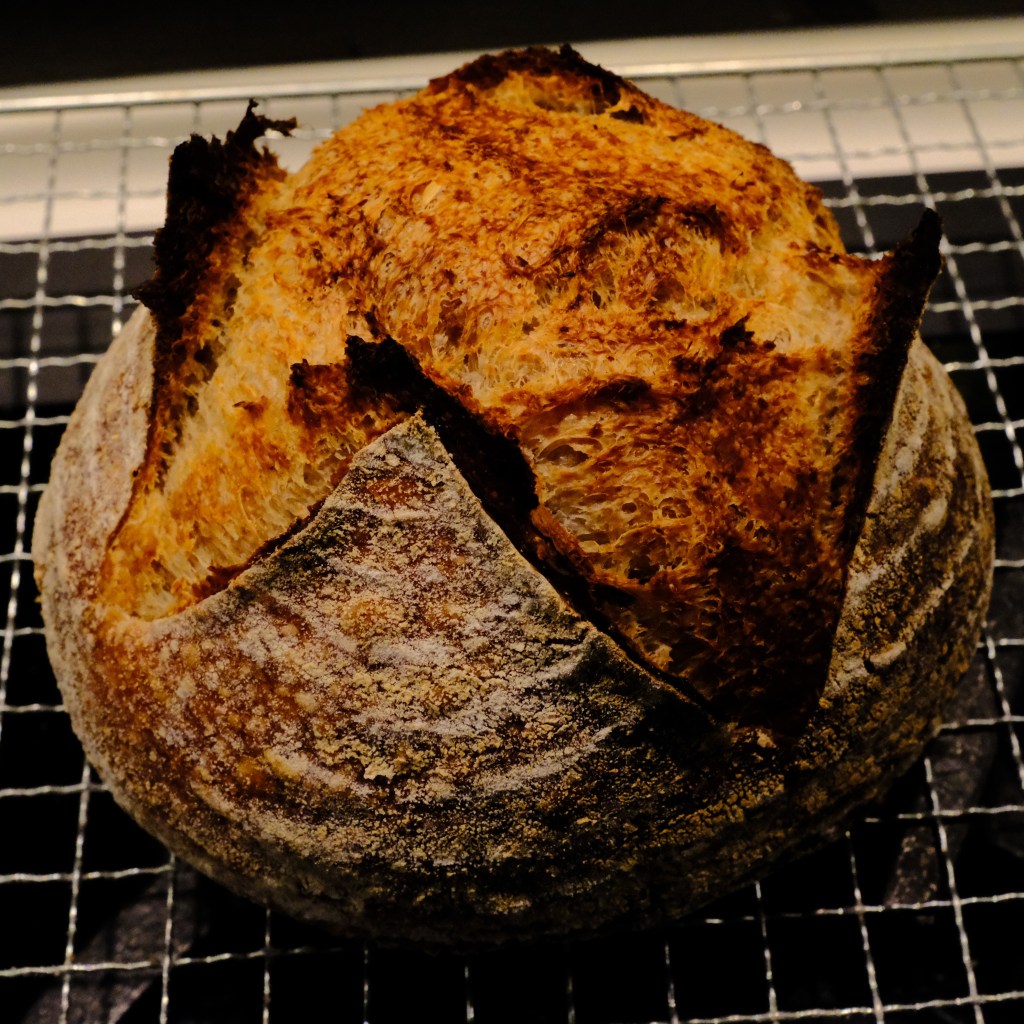
Bake in a glass casserole dish
So this was a surprise to me. I’ve baked many successful loaves in this glass casserole dish so was expecting something similar to the Dutch Oven.
Instead, there wasn’t much “burst”, however the oven spring was the same as the Dutch Oven; both loaves were the same height. I don’t know, maybe I didn’t score as deep? In any case, the crust was crispy and retained the banneton flour patterns.
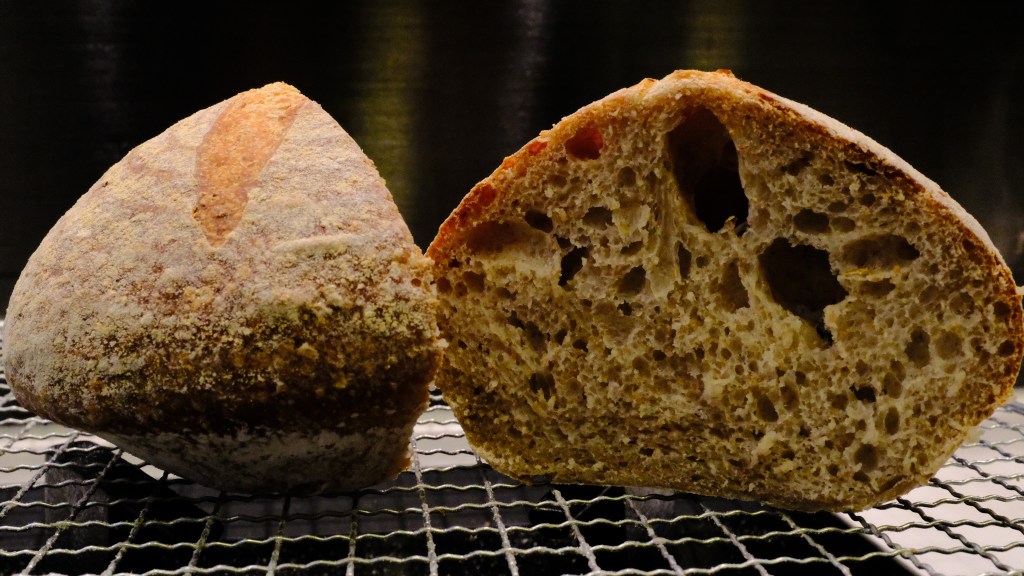
The crumb was also delicious, and here you can see the similarities to the Dutch Oven. But there are differences too. Firstly, you can see the loaf is narrower towards the bottom, indicating a different kind of rise than the Dutch Oven. It might just be the shaping was off, but there are less larger pockets in this crumb too.
It’s not very scientific of me, but I am kind of discounting this bake as I know I can get better results from the pyrex dish, like this one from a few months ago:
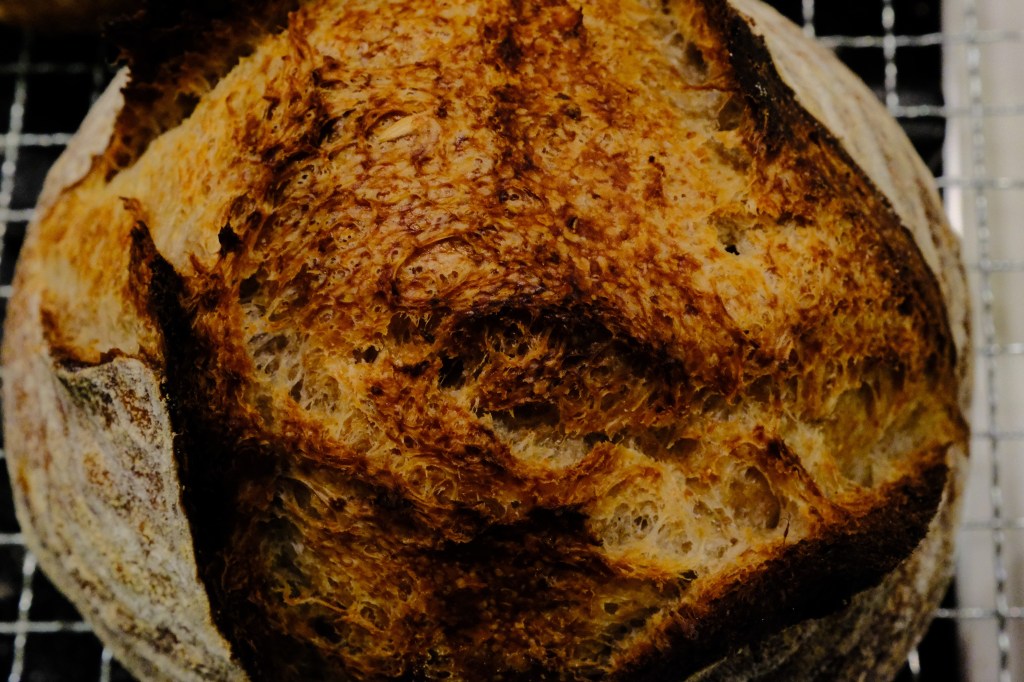
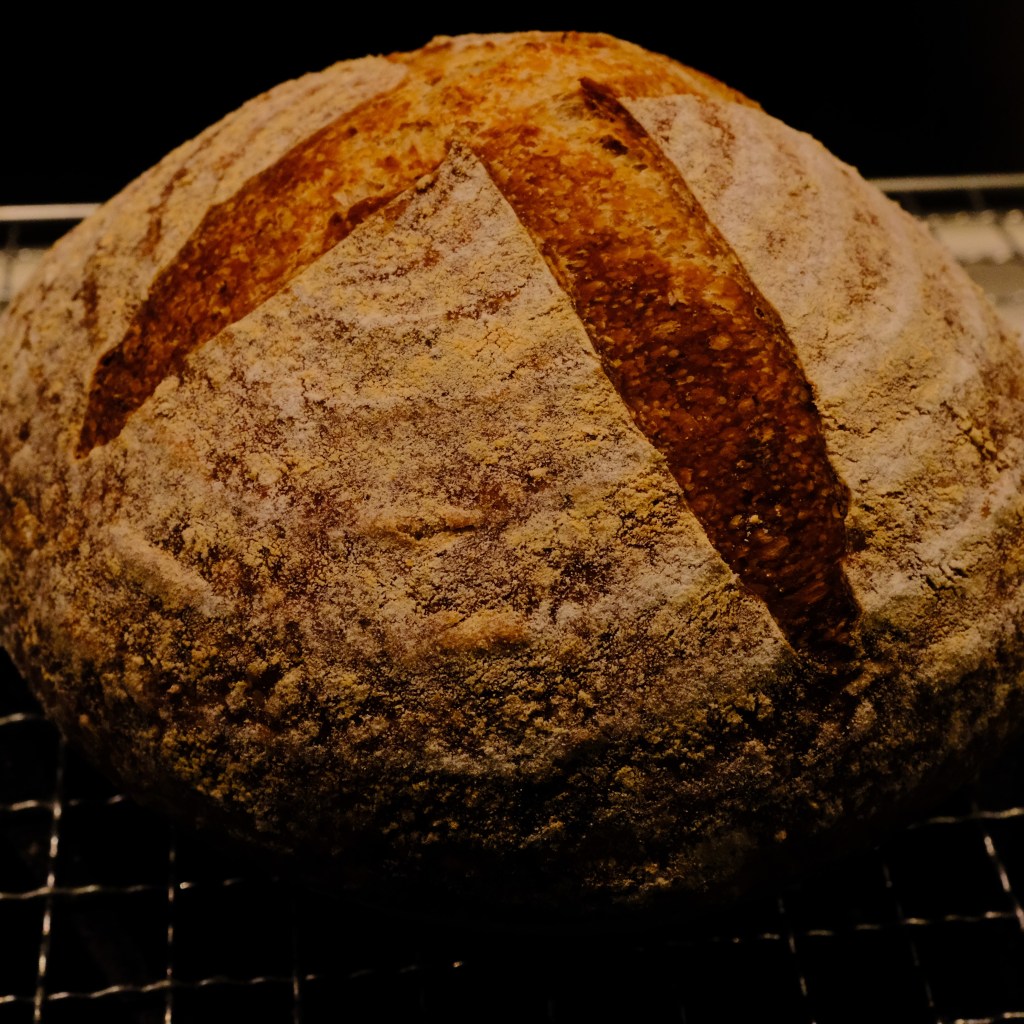
Bake with a tray of steam
The only method to cook entirely uncovered. A baking tray at the bottom of the oven was preheated and I added a cup of boiling water once the loaf was on it’s own tray on the shelf, quickly shutting the door to keep the steam in.
OK so this starts to get interesting. I think here you can see I didn’t score deeply enough, and one cut was deeper than the other promoting the burst in one place. I should pay more attention to that.
The big difference here is the look. The flour pattern from the bannetons has all but gone, and the whole loaf looks more golden due to the exposed and flourless crust. The blister bubbles on the surface are more apparent.
The crumb here closely resembled the Dutch Oven method with nicely spaced bubbles, glossy interior and chewy mouth-feel. The crust is thinner and lighter than the other methods, as I guess the steam doesn’t hang around and penetrate as much. Silly big bubble on the right is down to my poor shaping technique.
Bake with my oven’s superheated steam function + convection
Oops.
I was really looking forwards to trying this method. I use a small table-top cooker that is a combo steam/convection/grill/microwave. It cost around $600 and is the only thing that fits in my little kitchen.
Sadly, after four hours of preheating and baking, my oven decided to take a nap during the preheat for this test. And it wont wake up again. Toshiba is coming to look at it next week.
So sadly I didn’t get to bake for this part of the test, but I promise to try again in the future! As of now, this loaf is still proving in the fridge along with the 950g dough…42 hours and counting!
Side-by-side
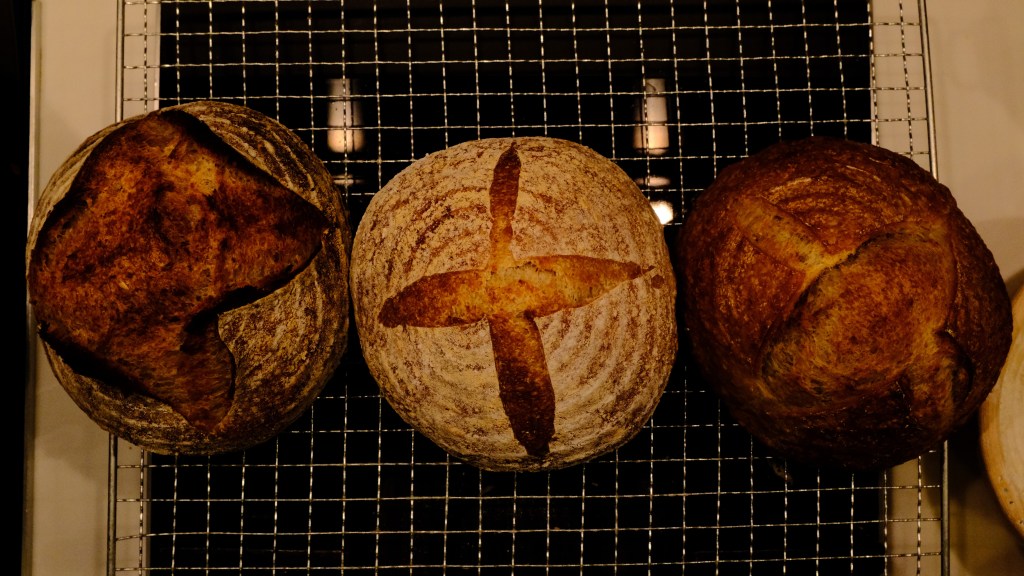
Each loaf was pretty much the same dimensions after cooking. They all weighed within a couple of grams of 200g too, indicating approx. 20% of weight was lost in cooking.
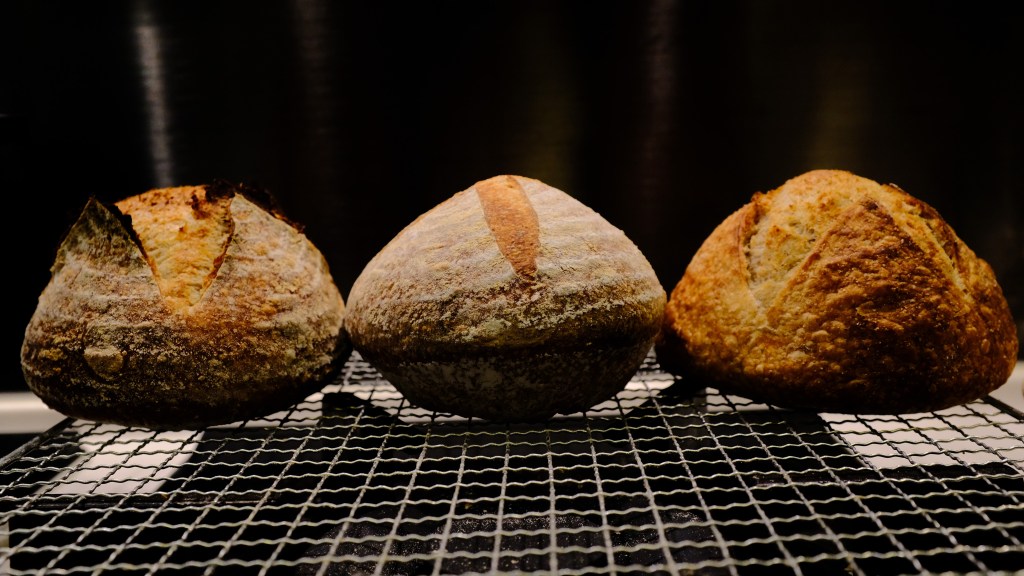
They were all similar height too. From the side you can really see the odd shape of the glass casserole bake (in the middle above).
Externally, I think my poor scoring technique is showing up – must work on that.
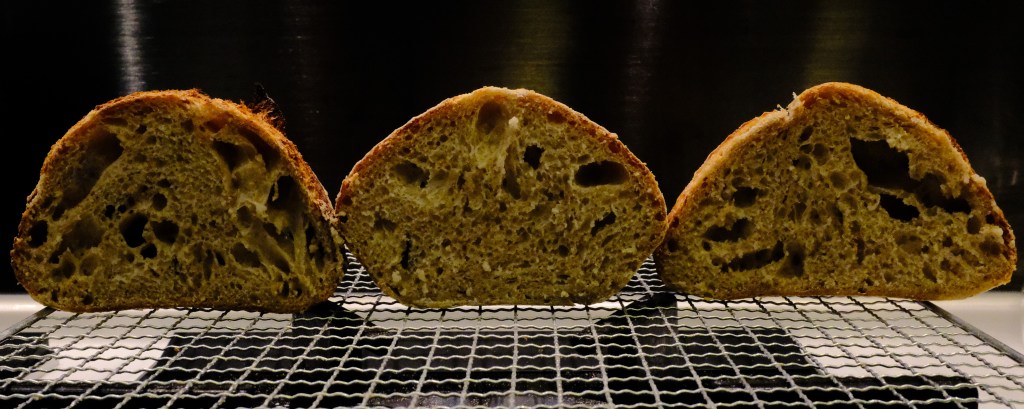
In the side-by-side comparison, you can see how similar the crumb is between all three loaves, perhaps a bit tighter at the bottom of the glass dish bake (centre). I can’t imagine the baking technique had much to do with that, rather differences in shaping and handling I would think.
The side profile is also interesting, showing how expansion was different in each case. Once my oven is working again I will have to try this again to see if the results are reproducible.
Final Thoughts
I’m gutted that my oven didn’t survive the whole test, I really wanted to see if superheated steam in a domestic table-top was able to compete with commercial ovens, or even a Dutch Oven.
The glass casserole disappointed me most, because in this test I didn’t get the great results I have had before. I was hoping to prove that it doesn’t matter what you bake in, but clearly there is a difference here. In spite of evidence to the contrary, I’ve done beautiful loaves in the glass casserole and will do it again to prove I’m right!
The tray of steam method surprised me, mostly because the rise was as good as the other methods, although a little more triangular and less rounded on top. The crust was thinner too, although the crumb was practically identical.
The Dutch Oven method is perhaps the most expected, as this looks like the loaves that line the glossy pages of all those expensive artisanal bread books. It’s got the colour, the crumb, the crust. Perhaps because so many people use this method it is de facto how we expect a sourdough to look. I’ll admit the bursting crust is impressive, and they taste as good as they look.